Top Customers Report

The Top Customer Report is one the most frequently used reports. It to used to list customers with the most sales based on search criteria.

Under the reports tab (as shown below, 1), click on “Top Customers” (2). Hover the cursor over a report name to see a description of that report.

top customers

1. As shown below, first enter how many top customers you want to see (e.g. top 5, top 10, top 100).

2. Select the order status you would like to base your top customers on (e.g. top 10 customer based on active dollars over shipped dollars). We normally suggest using active over booked because it’s a more realistic since it considers any revisions/cancellations.

3. Select the filters you would like (e.g. top 10 customers over a certain time period, from a certain market, or from a certain state).

4. Select if you want to include inactive customers and manufacturers.

5. Click “Generate Report” to see the results.


top customers2


A KEY SEARCH CRITERIA TO BE AWARE OF…
…is “rep selection.” If you are filtering by rep, decide between examining customers assigned reps or reps assigned to orders (rep1).


1. As shown below, the resulting report lists the top customers by rank, ordering them by dollar amount (2).

3. From the report, you can extract a customer’s email, make notes, and change market call labels.

top customers3

Essential Features for Report Results

When reviewing report results, there are several useful features that make your day-to-day more efficient and increase your business.
NOTE:
Showroom owners/managers may restrict their reps ability to Save and/or Print the report result.

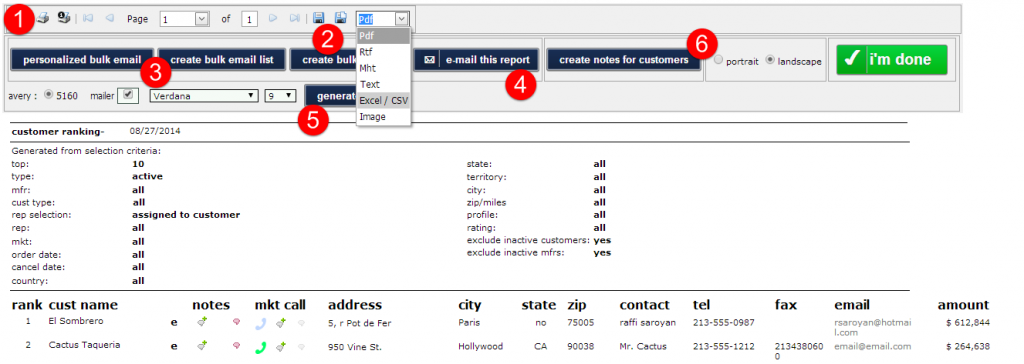
Once a report is generated, there are many ways you can work with the result:

1) Clicking the printer icon allows you to print the report.

2) Clicking the floppy disk icon saves/exports the report. In the drop down menu next to the icon, you can select the file type the file will save as. Most commons formats are PDF and CSV (for Excel).

3) You can send a Personalized Bulk Email to all of the contacts within the report. You can also export a list of all email address within the report that you can use to create a bulk email.

4) You can email the report itself.

5) You can create a note under all of the customers within the report.

report features


Saved Searches

If you have a repeated report that you often use the same criteria, save time by saving the report criteria so you don’t have to reenter the filters every time.

1) Click “Save Report Criteria” near the top of the page.

2) Click “add current search” once the criteria you wish to save has been entered.

3) Enter a name you would like to save the search as. Click the green check mark.

4) Click “saved searches” for a list of your searches to appear. Delete your saved searches by clicking “remove all searches”

saved search reports

Hotspots Now Show Dense Regions

We’ve updated the customer mapping feature to highlight hotspots.

Blue/Yellow circles indicate low/high dense areas:

As you zoom in, hotspots adjust accordingly:

Related

Map Customer Locations:
http://blog.showroomexchange.com/map-customer-locations/

Project Your Commissions

Commission Projections, one of our most popular reports, estimates the commission your showroom will receive in the future based on realistic parameters, e.g.; what % of your booking will ship and when you typically get paid, such as 2 or 3 months after the cancellation date.


commission projection report1

“by rep/mfr” selection is ideal for reporting your reps’ expected commissions.
“by mfr” selection is ideal for reporting your showroom’s expected commission.

commission projection report2


1. “% of booked orders that will ship,” is used to calculate the commission due – this the % you expect the mfr/brand to ship.

2. Check the box next to “Make my AR look more realistic” to shift commission dollar values to the months you are most likely to receive them.


commission projection report3


Sample results:


commission projection report4

commission projection report5

Customer Locations and Mapping

2 Ways of Mapping Customer Locations

Learn when it’s best to map customer locations with Google Maps v. Google Earth.

Check out this other post to learn more…


Driving Directions Between Customers

Find out the best route between your customers, the distance in miles, and about how much gas will cost.

Check out this other post to learn more…


Search for Customers by Zip Code

Add a mile radius around the zip code to search for your customers in a larger area.

Check out this other post to learn more…


Customer Search by Zip Code

When filtering/searching for customers, you may use the zip code column to search the surrounding region (e.g. 90210, as shown in the screenshot below).

After entering the zip code, press the tab key to then enter a mile radius around the zip code. Any customer with a valid address and zip code that meets the criteria will be included in the search.

In the resulting list of customers, an old-compass icon will be displayed following the zip code for each row. Clicking on the icon for a given customer will list the distance (in miles) from that customer’s address to the rest.

In the example below, “Soot Bull Jeep” is 2.6 miles from “Macy’s” and “Dream Scene” is 7.9 miles from “Macy’s.”
“Brass Nuckles” does not have a distance listed due to its inaccurate address.

To view customers in a specific zip code ONLY, e.g.; only 90210, after pressing tab, leave the default miles value as zero.


Once you’ve pulled up the customers within a given area, you can view them on a map, create driving directions, send bulk emails, etc.

Discounts

To track discounts in Showroom Exchange, consider the following:

How does tracking discounts matter to your showroom?
A) Are they commission related? When a discount is applied, does it lower the rep’s and the showroom’s commission rate? If a $100 order with a 10% discount ships 100% complete, does the brand show $90 or $100 in their commission statement?
B) Are they more booking related? e.g.; On a $100 order with a 10% discount, would the showroom view the order booked as $100 or $90? Does the rep get $100 or $90 booking credit?


An excel sheet illustrating the three Scenarios is below:

discounts


Scenario A)

If entering the order with the discounted total works for you and rep commissions are based on discounted values, then simply enter the order at discounted prices. Commissions will be correct. e.g.; rep’s standard commission rate is 1%, order is entered @ $90 and the rep’s comm will be $9.

This method is best used when your showroom cares about discounted commissions, doesn’t care about non-discounted booking totals, and doesn’t care to track discounts.


Scenario B)

If you want to enter the non-discounted dollar values into Showroom Exchange, but commissions are based on discounted values, enter the correct discounted rep commission during order entry (e.g.; 0.9% comm for $100), or for a more automated approach, use the commission matrix feature.

Following the above example:


discounts1

If you have opted to use the commission matrix, make sure to edit the SR’s commission on an order and the rep’s commission will adjust accordingly.


Scenario C)

You can create/use a new cancellation (revision) reason (e.g., “[sr] discount”) and apply a discount. This allows for the non-discounted total to be entered and the commissions will be based on discounted values (see below).

discounts3

discounts4


discounts5


Like Scenario A, this method is best used when your showroom cares about discounted commissions and doesn’t care about non discounted booking totals, but use this scenario if you DO care to track discounts.


2 Ways To Merge Duplicate Customers

Showroom Exchange can identify similar customers that may be potential duplicates and merge them along with their orders, invoices, etc. to reduce redundancy.

There are two different approaches…


Method 1: Identify Dups

Use “identify dups” from the customer tab to let Showroom Exchange identify potential duplicates. If you do not already have access to “identify dups”, ask your showroom manager/owner to email help@readytoview.com

The pop-up screen shown below will list potential duplicate customers:

1) Click “less restrictive match” to include more matches, and “more restrictive match” if you prefer to see customers that rank high in being a duplicate.

2) From each group, check the customers to be merged under ‘consider as dup’ (e.g.; SE might identify four as dups, but you only consider 2 as dups) and select which customer will be kept.

3) Select “click to proceed”, a summary of records to be kept, deleted, and ignored will be listed. Select “click to proceed” again for final confirmation.

“Identify dups” is best used on regular intervals, e.g.; once a year or immediately after a large customer import.


Method 2: Merge Current Selection

If you know there are two or more customers that should exist as one, you can search/filter the specific customers (e.g. Barney’s|Barney’s LA) and click “merge current selection” (as shown below).

Note:
“merge current selection” will not appear on the customer tab until there is a search/filter entered.


A pop-up similar to the previous pop-up will appear (shown below) where you select the dups, pick the customer you want to keep, select “click to proceed,” verify changes, and make one final confirmation.

This method is best used when you KNOW multiple customers exist for the same account. They might not even be very similar to each other in terms of address or state but have combined for one reason or another. For that reason, they would not show up under “identify dups.”

Consider “identify dups” as a BULK merge and “merge current selection” as Hand-Picked merge.


Important Note:

A customer can only have 10 contacts so be careful when merging customers. If one customer has 5 contacts and the other has 6, the 6th contact will be discarded.

Personalized Bulk Email, the Basics

Why Send a Test Before Releasing the Final e-Blast?

Send a test to make sure your email blast looks fine before sending it out to ALL of your recipients. You can ONLY send the blast when at least one test has been sent.
Check out this other post to learn more…


Manage Your Personalized Bulk Email Templates

Save time creating future email blasts by saving your current one as a Template.
Check out this other post to learn more…


3 Different Methods for Inserting Pictures

Make your email eye catching and well designed by embedding an image.
Check out this other post to learn more…