2 Ways To Merge Duplicate Customers

Showroom Exchange can identify similar customers that may be potential duplicates and merge them along with their orders, invoices, etc. to reduce redundancy.

There are two different approaches…


Method 1: Identify Dups

Use “identify dups” from the customer tab to let Showroom Exchange identify potential duplicates. If you do not already have access to “identify dups”, ask your showroom manager/owner to email help@readytoview.com

The pop-up screen shown below will list potential duplicate customers:

1) Click “less restrictive match” to include more matches, and “more restrictive match” if you prefer to see customers that rank high in being a duplicate.

2) From each group, check the customers to be merged under ‘consider as dup’ (e.g.; SE might identify four as dups, but you only consider 2 as dups) and select which customer will be kept.

3) Select “click to proceed”, a summary of records to be kept, deleted, and ignored will be listed. Select “click to proceed” again for final confirmation.

“Identify dups” is best used on regular intervals, e.g.; once a year or immediately after a large customer import.


Method 2: Merge Current Selection

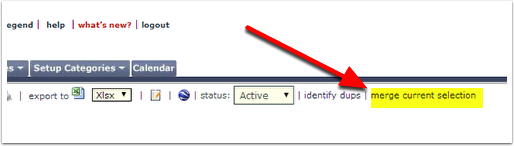
If you know there are two or more customers that should exist as one, you can search/filter the specific customers (e.g. Barney’s|Barney’s LA) and click “merge current selection” (as shown below).

Note:
“merge current selection” will not appear on the customer tab until there is a search/filter entered.


A pop-up similar to the previous pop-up will appear (shown below) where you select the dups, pick the customer you want to keep, select “click to proceed,” verify changes, and make one final confirmation.

This method is best used when you KNOW multiple customers exist for the same account. They might not even be very similar to each other in terms of address or state but have combined for one reason or another. For that reason, they would not show up under “identify dups.”

Consider “identify dups” as a BULK merge and “merge current selection” as Hand-Picked merge.


Important Note:

A customer can only have 10 contacts so be careful when merging customers. If one customer has 5 contacts and the other has 6, the 6th contact will be discarded.

Personalized Bulk Email, the Basics

Why Send a Test Before Releasing the Final e-Blast?

Send a test to make sure your email blast looks fine before sending it out to ALL of your recipients. You can ONLY send the blast when at least one test has been sent.
Check out this other post to learn more…


Manage Your Personalized Bulk Email Templates

Save time creating future email blasts by saving your current one as a Template.
Check out this other post to learn more…


3 Different Methods for Inserting Pictures

Make your email eye catching and well designed by embedding an image.
Check out this other post to learn more…

Eliminate “a_service_of@showroomexchange.com” from e-blasts

If you’re not using a free web-based email service provider,* such as hotmail.com, outlook.com, gmail.com etc. (aol & yahoo are exceptions) i.e.; if you’re using your own domain similar to anyname.com, your_company_name.com or your_showroom_name.com, you can avoid sending e-blasts that say…

FROM: your_name@your_company_name.com (sent on behalf of a_service_of@showroomexchange.com)

and with a couple of steps, your e-blast recipients will see your YOUR address in the FROM field, without any mention of “a_service_of@showroomexchange.com”:

FROM: your_name@your_company_name.com

.

2 STEPS:

** The following instructions are technical. The person who maintains your registrar should be familiar with them. Alternatively, you can contact the registrar’s technical support team. **

STEP I:
Ask the person who maintains your domain name records to add the contents in the parenthesis #A to your zone file’s SPF record:

#A (include:mta.showroomexchange.com)
NOTE: (~all) is recommended instead of (-all)

If an SPF record does not already exist, one must be created.

If you’re not sure who your registrar is, visit www.godaddy.com/whois to look-up your domain name and look for the line identified with “Registrar“.


STEP II:

When the change is completed on your end, email help@readytoview.com. We will use the following tools/web-links to verify the same:

http://mxtoolbox.com/spf.aspx
http://www.kitterman.com/spf/validate.html

Once verified, we’ll flip a switch on our end and ask you to logout/login once.
With your next login your e-blasts will originate from your company email address.


* related:

http://blog.showroomexchange.com/dmark-policy/

http://en.wikipedia.org/wiki/Sender_Policy_Framework

Manage Your Personalized Bulk Email Templates

If you reuse the same content or design of a personalized-bulk-email (PBE) often, you can save it as a template.

Use the ‘Save’ option to recall your PBE for future campaigns.

To save your PBE for future reference, click the “Templates” button (as shown) after you have composed it. Choose “save as template” and enter a unique description (e.g.; Coterie Invitation) Next, click “submit” to save it.


pbe templates1


To retrieve a template you have saved, click “templates” and select “choose an existing template” as shown. From the next drop-down select the template you wish to re-use. Click “submit”. The content of the template will appear shortly thereafter.

pbe templates2

pbe templates 3


To delete a saved template, click “templates,” choose option “delete an existing template,” choose the template you wish to delete, and click “submit.”

pbe templates 4

pbe templates 3

Save Time with Shortcuts

Check out these tips that will increase productivity

Search Symbols

Expand your filtering capabilities with just 3 symbols (e.g.; which of my customers in southern California have NOT booked a certain brand/mfr?)
Check out this other post to learn more…

Single Search for POs, Customers, Notes, etc.

With the search field at the very top-left of almost every page, you can search for your customers, contacts, order PO numbers, etc. all in one field
Check out this other post to learn more…

Mark Multiple Invoices as Paid

With this feature, mark multiple invoices with a pdate (paid date) at the same time instead of having to edit them individually.
Check out this other post to learn more…

Mark Multiple Invoices as Paid

Some brands/mfrs often report their shipments and pay the showroom later.
You may enter the shipments as invoices and later update their pdate (paid date) with the check-date or the wire-transfer date.

With the “mark multi-invoices as paid” feature under the invoices tab, you can quickly enter in a single pdate for many invoices at one time, making update of these unpaid invoices quick and easy.


  • Click “mark multi-invoices as paid”

mark multiple invoices paid


  • Enter in the manufacturer at the top of the screen as well as the pay date (see below, 1)
  • Enter in the invoice PO #’s (2)
  • Click “save” to process the invoices you entered as paid (3)

mark multiple invoices paid2

You can also quickly copy a list of invoice POs from excel and paste it into the text field (see video below)

How to Block Exporting/Printing Reports and Other Information

Admin users/reps can prevent regular users/reps from printing/exporting reports or other private information, such as commissions and customer information.

From “setup categories”, select “showroom users,” click on the name you wish to apply restrictions to, and confirm that certain check-boxes are selected/un-selected:


settings--- users

1) “Allow Print Report on Customer View” is unchecked (you might want to also consider the options below this one because they relate to exporting)
These options help prevent the user from printing information on the main tabs (e.g. orders, invoices, etc.)

block export_printing1

2) “Allow reports result to email” is unchecked.
This prevents the user from emailing report information.

block export_printing3

3) “Allow Export from Views” is unchecked.
This will prevent the user from exporting-to-excel on the main tabs

block export_printing2

4) “hide Print option on report result” and “hide Save As option on report result” are checked
This will hide the printer icon and the save icon for all reports.

block export_printing4

You can choose the options that best fit your showroom policy.


WE ALWAYS RECOMMEND THAT YOU SIGN-IN WITH THE NON-ADMIN — USER’S CREDENTIALS TO CONFIRM THE RESULTING PERMISSIONS MEET YOUR EXPECTATIONS.


restrict printing customer info