Using Pinterest with your Personalized Bulk Emails?

Pinterest

Social Media marketing is more prominent than ever. In particular Pinterest can help promote your showroom brands and their collections.

Here’s how:

1- Pinterest is an extremely visual social media site where users can “pin” images and categorize them to specific “dashboards.”
2- Showrooms can connect with buyers visually by creating “dashboards” for specific deliveries and or collections. (see screenshot below)
3- Showrooms can then use the dashboard link in a PBE (personalized bulk email) marketing campaign allowing buyers to see the items per specific delivery date. The images can be placed with additional information such as style #’s and price tags.

Pinterest is a great way for showrooms to quickly create an online catalog, look books or merchandising boards.

Click here to view a YouTube video: How to use Pinterest

Click below image to Enlarge a sample dashboard.

Pinterest

How Do I Delete a User-ID?

Important: Once an userId is deleted, so is the the history associated with it. Deleted userIds cannot be recovered. 

To delete a userId, please follow the steps below:

1. Hover over “Setup Categories” and choose “showroom users”


2. Click your Rep’s login userId that you would like to Delete

3. Scroll down and click on the red “delete” button. There will be a prompt to confirm, click “ok” to process the deletion.

The monthly billing reduction will be scheduled for your next invoice.

Fastest Way to Create a New User-ID is to Copy One

The quickest way to create a new user is to duplicate an exisiing one

Creating a new user will affect your monthly billing. Please refer to our pricing page prior to creating new users.
Showroom Exchange Pricing

To duplicate a current user, follow these steps. To create a new admin user, please email us at help@readytoview.com.

1. Hover over “Setup Categories” and click on “showroom users.”
2. Click on “copy user.”

3. Select the user you want to copy permissions from.

4. Fill in all required information signified by the red asterisk.
5. Verify all applicable permissions
6. Once completed, click the green “Save” button.

A notification will be sent to us and your billing will be adjusted for the next month.

The Fastest Search Method Available

If you are not using this feature already, try it once and you will you will be hooked. The search all feature shown below is a single field available on all pages. it will search all major content (orders, customers, contacts, invoices, notes) in showroom exchange based on your entry.

It’s a no brainer, just type in the mfr po, cust name, a note or invoice number and see the respective results on a popup moments after your entry. For more details, you may visit our previous post on this feature.

Single Search


Search All

My Excel Reports Come Out As Gibberish

Excel Gibberish

When saving a report as a .xls, .xlsx, or .csv, the user must make sure they are opening with Excel. The most common mistake is opening these files with your browser. See sample below:

Excel Correct and Incorrect

First, make sure that you have Excel installed.

If it is installed, make sure to point to Microsoft Excel. This can be done by selecting the “Open With” dropdown and select “Microsoft Excel” (see above)

If Excel is not available on the list, then click “other” and then “Browse…”

Excel Other

Excel Browse

Navigate to C:\Program Files\Microsoft Office\Office\ and select Excel or Excel.exe

Excel Directory

If you have any difficulties, please contact your IT technician.


My PDF Reports Come Out As Gibberish

PDF Gibberish

When saving a report as a .PDF, the user must make sure they are opening with Adobe Reader. The most common mistake is opening a .PDF with your browser. See sample below:

PDF Correct and Incorrect

First, make sure that you have Adobe Reader installed, if not, you can obtain Adobe Reader free here: http://get.adobe.com/reader/

If it is installed, make sure to point to Adobe Reader. This can be done by selecting the “Open With” dropdown and select “Adobe Reader.” (see above)

If Adobe Reader is not available on the list, then click “other” and then “Browse…”

Open With Other


Browse Other

In Windows 7, navigate to C:\Program Files (x86)\Adobe\Reader 10.0\Reader and select AcroRd32 or AcroRd32.exe

In Windows XP, navigate to C:\Program Files\Adobe\Reader 10.0\Reader and select AcroRd32 or AcroRd32.exe

Path to Reader

If you have any difficulties, please contact your IT technician.


Identifying and Merging Duplicate Accounts

The safest way to merge duplicate accounts is to use showroom exchange’s “identify dups” feature.

How do I do it?

1. From the customer view click on “idenfity dups.” If this feature is not available, please have your administrative user contact us to enable.

more restrictive match
Exact customer name
Left 6 character of Address1
Left 4 character of City
State

less restrictive match
Left 5 character Customer [with space, period and apostrophe not considered in the comparison]
Left 6 character of Address1
Left 4 character of City
State

2. Showroom exchange will list duplicate accounts in a new window.
3. Use “consider as dup” checkbox to select as many accounts that are duplicated and choose the main account to keep

Consider as Dup

4. “Click to proceed” to move onto the verification screen.

Merge Verification

5. Select “click to proceed” and press the “OK”

Are You Sure?

Merge Multiple Accounts

If you have multiple customers that you would like to merge into one but are under different names follow the steps below:

Try the identify dups feature first. See if it can provide the desired list of customers you would like to merge. If identify dupes does not meet the expected result, please proceed with the next step.

*** Please note that the “Merge Current Selection” function will give you more control by allowing you to select the specific customers that you would like to merge regardless of name similarity or address proximity. ***

How do I do it?

From the customer view, search for the customers you want to merge. In this example, we searched “macy*”. This means that I want merge all Macy customers into one, regardless of address, contact info, etc.

Macy's

1. Click on “Merge Current Selection” (note: this option only displays when a search is entered).

merge dups
2. Select all the customers you want to merge and the one that you want to keep after the merge.

Merge Multiple

3. “click to proceed” to move onto the verification screen.

Merge Verification

4. Select “click to proceed” and then press the “OK” button on the following pop-up.

Are you Sure?

Once these steps are taken the original files will be combined into one record in your database.

Personalized Bulk Email Tracking

Showroom Exchange now allows you to track the deliverability of your personalized bulk emails. Check to see if your recipients opened your email campaign and view the click through rate for embedded links that they may have clicked.

Once your campaign is submitted it takes 1-2 hours from the time the recipient opens or clicks on the link for the stats to be populated. For this reason it is best to check campaign stats starting at least 4 hours after submission. Consider checking the stats for the same campaign at different times to track progress.

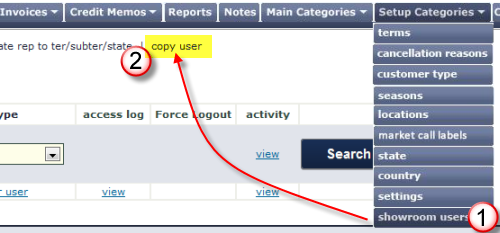
To track your email campaign, hover your mouse over “Customers” and click on “PBE sent items.”

PBE Sent Items


Click on the stats icon (pie graph) for your email campaign stats.
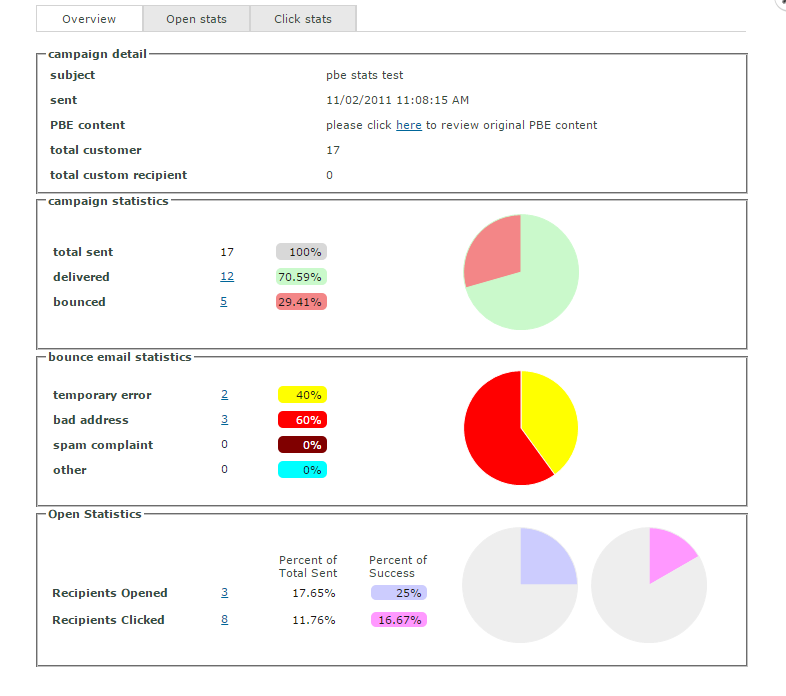
PBE Pie Chart Icon


Notice the “Overview”, “Open Stats” and “Link/Click stats” tabs (see screenshot below). The “Overview” tab covers the delivered and bounced rate of your email as well as general open and click statistics.

You can click on the number of Recipients Opened/Click to get more details on who specifically opened and displayed images or clicked on your links.
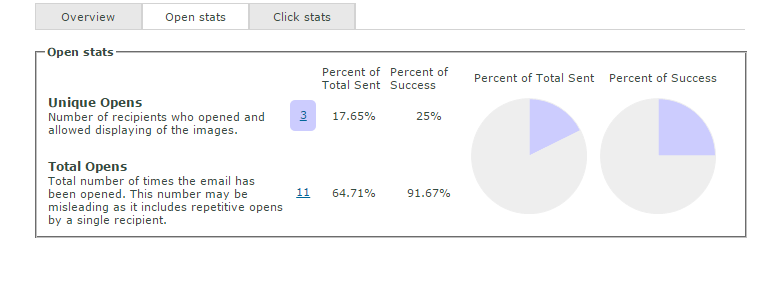
pbe.stats1


From the “Open Stats” tab you’ll be able to see your open statistics in more detail. You will be able to see unique v. total opens (definitions are on this tab).

pbe.stats2


On the “Click Stats” tab, you can see you click stats in more detail. Not only can you see unique v. total clicks, but you can see a unique/total click break down for each of the links within your email.

pbe.stats3


Click on the number to see who exactly clicked on the link.

pbe.stats4


IMPORTANT: Please understand that the open rate is not a 100% accurate measure. The “open” % rate is available only if the recipients email is capable of displaying html with images, and the “View Images” option is turned on when they view your email. If the recipient opens the email but does not allow displaying of images; stats cannot be logged. Link tracking is logged when the recipient clicks on any of your embedded links.


Definitions:
Subject: the subject for your PBE.
Sent: date and time sent.
PBE content: a copy of your sent PBE.
Total customer: the customers you chose to send to.
Total custom recipients: emails that you manually entered (not an existing customer record).
Total sent: count/percentage of total emails sent.
Delivered: count/percentage of emails delivered.
Bounced: count/percentage of emails bounced due to the following reasons below.
Bad address: count/percentage of recipients with incorrect email addresses.
Temporary error: count/percentage of recipients who may or may not receive your PBE. This condition applies to recipients whose mail servers remain (at the time of viewing the stats) unresponsive. No later than 5 days from the time the PBE was sent, these values should become bad address, spam complaint, other errors or delivered messages.
Spam complaint: count/percentage of recipients who marked your PBE as spam. This is most commonly done with the respective email program’s “this is spam”, “mark as spam” or “block all emails from this user”, etc.
Other: percentage of customers who did not receive your PBE that is not classified in the reasons above.

Best Practice for Personalized Bulk Emails

You can never undo a bulk send! When creating a personalized bulk email, don’t forget to first send a test to yourself. This will help confirm that you are happy with the results.

Follow these simple steps. First, create a test customer in showroom exchange and name it after something you’ll remember. e.g.; your showroom and your reps as the contacts. Under the contact email fields, add seed accounts for testing. e.g.;
Email1: yourname@yourshowroom.com
Email1: yourpeer@yourshowroom.com
Email3: yourshowroom@gmail.com *
Email4: yourshowroom@yahoo.com *
Email5: yourshowroom@hotmail.com *
*use existing accounts or create new ones

After your test customer is created, search for it on the customer view.
** MAKE SURE ONLY YOUR TEST ACCOUNT IS LISTED. **
Choose “use email or fax of all contacts” and click “personalized bulk email.”


PBE All Contacts


Now create your personalized bulk email. When completed, be sure to save as a template before sending. This way, when sending a personalized bulk email, you can review it from different emails to verify that you are satisfied with the end results.

If all looks good in the multiple inboxes, you can then send out the blast to your targeted recipients. Also, don’t forget to change the target recipient from ALL to Primary, assuming that you only intend to send it to just the main contact.