On the Customer tab, click on a Mfr name corresponding to a customer to view their respective order(s)

You will be redirected to the Order tab and orders for the selected Mfr/Customer will be displayed

Knowledge Base
On the Customer tab, click on a Mfr name corresponding to a customer to view their respective order(s)
You will be redirected to the Order tab and orders for the selected Mfr/Customer will be displayed
1. Less clutter, FOCUS on those that matter. Searches/Filters will load faster.
2. Inactive customers are excluded from order entry. They can also be excluded from reporting and search results.
NOTE: You can also make other entities in Showroom Exchange active/inactive, such as mfrs and reps.
Make a customer active/inactive by going to their page and unchecking/checking the box next to active.

Exclude inactive customers on the customer tab by clicking on “active” next to “status”:
Include/exclude inactive customers in reports. Uncheck or check the box by “exclude inactive customers” at the bottom of the report screen. You can find this option on most reports.

There’s no silver bullet for getting passed spam filters. Even when your recipients have given their thumbs up.
Spam is unsolicited email sent to a list of people. It is not spam if you take that list and write personal, one-to-one emails to each recipient, and the content is unique for each recipient. Personalizing your email to individual recipients within Showroom Exchange helps avoid spam filters (see link below).
The United States federal CAN-SPAM Act became law on January 1, 2004. According to their website, the FTC says that if you violate the law, you could be fined $11,000 for each offense. Consult with your lawyer if you have one.
Each email provider uses a different type of filtering system, for example SpamAssassin will assign points and determine which emails should be tagged as spam. Here are a few of their criteria:
How do you tell if you are being spam filtered? Check your open rate, if it suddenly dropped from your average then you are probably being spam-filtered. If your bounce rate is higher than normal, that might also indicate that you are being spam filtered.
http://blog.showroomexchange.com/reduce-the-risk-of-e-balsts-getting-tagged-as-spam/
You may now test your PBE by sending it to any address. Initially your own address will be populated, but you can edit it by clicking on the email. To edit the test address, click on the email address and then click save icon once the other address has been entered.
Testing your PBE is important because this way you make sure everything looks the way it should before you send it out to mass amounts of people


Social Media marketing is more prominent than ever. In particular Pinterest can help promote your showroom brands and their collections.
Here’s how:
1- Pinterest is an extremely visual social media site where users can “pin†images and categorize them to specific “dashboards.â€
2- Showrooms can connect with buyers visually by creating “dashboards†for specific deliveries and or collections. (see screenshot below)
3- Showrooms can then use the dashboard link in a PBE (personalized bulk email) marketing campaign allowing buyers to see the items per specific delivery date. The images can be placed with additional information such as style #’s and price tags.
Pinterest is a great way for showrooms to quickly create an online catalog, look books or merchandising boards.
Click here to view a YouTube video: How to use Pinterest
Click below image to Enlarge a sample dashboard.

I will:
If you are not using this feature already, try it once and you will you will be hooked. The search all feature shown below is a single field available on all pages. it will search all major content (orders, customers, contacts, invoices, notes) in showroom exchange based on your entry.
It’s a no brainer, just type in the mfr po, cust name, a note or invoice number and see the respective results on a popup moments after your entry. For more details, you may visit our previous post on this feature.

If you are currently using Internet Explorer, showroom exchange highly recommends switching to Firefox or Google Chrome. There are known issues with older versions of Internet Explorer (prior to version 9) such as longer times for rendering pages. e.g. white pages when navigating different tabs in showroom exchange.
If you are using Internet Explorer 9, the issue may not be as dramatic; however, we still recommend Firefox or Google Chrome. You can obtain them from the following links:
Firefox www.mozilla.org/firefox
Chrome www.google.com/chrome
Showroom Exchange now allows you to track the deliverability of your personalized bulk emails. Check to see if your recipients opened your email campaign and view the click through rate for embedded links that they may have clicked.
Once your campaign is submitted it takes 1-2 hours from the time the recipient opens or clicks on the link for the stats to be populated. For this reason it is best to check campaign stats starting at least 4 hours after submission. Consider checking the stats for the same campaign at different times to track progress.
To track your email campaign, hover your mouse over “Customers” and click on “PBE sent items.”

Click on the stats icon (pie graph) for your email campaign stats.

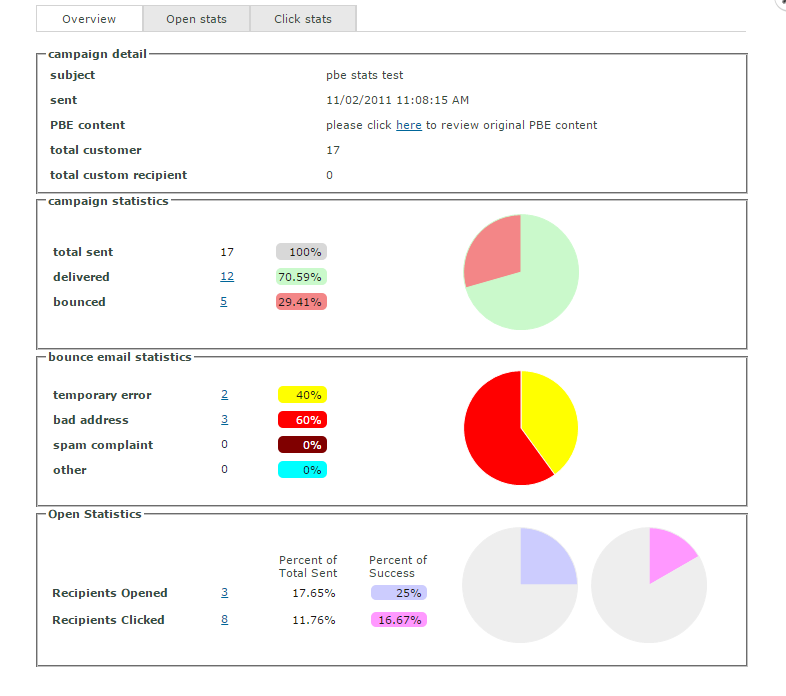
Notice the “Overview”, “Open Stats” and “Link/Click stats” tabs (see screenshot below). The “Overview” tab covers the delivered and bounced rate of your email as well as general open and click statistics.
You can click on the number of Recipients Opened/Click to get more details on who specifically opened and displayed images or clicked on your links.
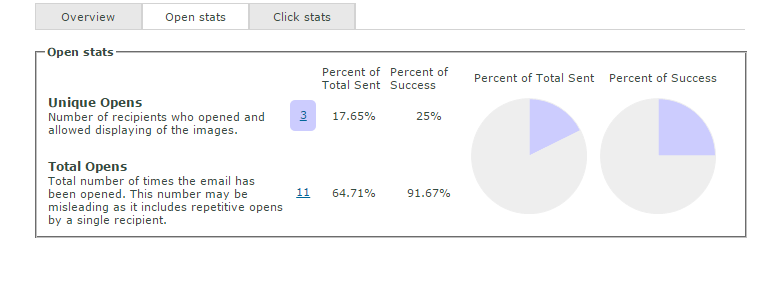
From the “Open Stats” tab you’ll be able to see your open statistics in more detail. You will be able to see unique v. total opens (definitions are on this tab).
On the “Click Stats” tab, you can see you click stats in more detail. Not only can you see unique v. total clicks, but you can see a unique/total click break down for each of the links within your email.

Click on the number to see who exactly clicked on the link.

IMPORTANT: Please understand that the open rate is not a 100% accurate measure. The “open” % rate is available only if the recipients email is capable of displaying html with images, and the “View Images” option is turned on when they view your email. If the recipient opens the email but does not allow displaying of images; stats cannot be logged. Link tracking is logged when the recipient clicks on any of your embedded links.
Definitions:
Subject: the subject for your PBE.
Sent: date and time sent.
PBE content: a copy of your sent PBE.
Total customer: the customers you chose to send to.
Total custom recipients: emails that you manually entered (not an existing customer record).
Total sent: count/percentage of total emails sent.
Delivered: count/percentage of emails delivered.
Bounced: count/percentage of emails bounced due to the following reasons below.
Bad address: count/percentage of recipients with incorrect email addresses.
Temporary error: count/percentage of recipients who may or may not receive your PBE. This condition applies to recipients whose mail servers remain (at the time of viewing the stats) unresponsive. No later than 5 days from the time the PBE was sent, these values should become bad address, spam complaint, other errors or delivered messages.
Spam complaint: count/percentage of recipients who marked your PBE as spam. This is most commonly done with the respective email program’s “this is spam”, “mark as spam” or “block all emails from this user”, etc.
Other: percentage of customers who did not receive your PBE that is not classified in the reasons above.
You can never undo a bulk send! When creating a personalized bulk email, don’t forget to first send a test to yourself. This will help confirm that you are happy with the results.
Follow these simple steps. First, create a test customer in showroom exchange and name it after something you’ll remember. e.g.; your showroom and your reps as the contacts. Under the contact email fields, add seed accounts for testing. e.g.;
Email1: yourname@yourshowroom.com
Email1: yourpeer@yourshowroom.com
Email3: yourshowroom@gmail.com *
Email4: yourshowroom@yahoo.com *
Email5: yourshowroom@hotmail.com *
*use existing accounts or create new ones
After your test customer is created, search for it on the customer view.
** MAKE SURE ONLY YOUR TEST ACCOUNT IS LISTED. **
Choose “use email or fax of all contacts” and click “personalized bulk email.”

Now create your personalized bulk email. When completed, be sure to save as a template before sending. This way, when sending a personalized bulk email, you can review it from different emails to verify that you are satisfied with the end results.
If all looks good in the multiple inboxes, you can then send out the blast to your targeted recipients. Also, don’t forget to change the target recipient from ALL to Primary, assuming that you only intend to send it to just the main contact.