How Do I Lockout or Change my Rep’s Password?

To change a user’s or rep’s password…


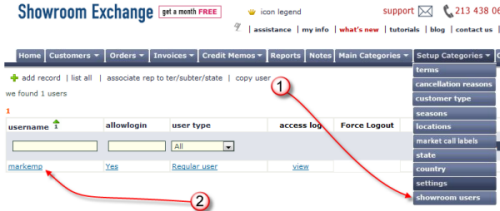
1. Hover over “Setup Categories” and choose “showroom users”


SR Lockout or Change PW


2. Choose your Rep’s login username by clicking on the UserID

3. Changing the passwords or disabling logins
a. [CHANGE PASSWORD] Enter the new password in the “new password” and “confirm password” field


Change Password


b. [DISABLE LOGIN]
Disable Login


4. Scroll to the end of the page and click save changes to current record
Alternatively, you can also assign the user’s login hours (e.g. your hours of operations)
Follow steps 1-2 above and choose “assign login hours”


Assign Hours


On the next page, you can assign “all” hours or limit to just business hours. See example below:


Choose Hours
Once completed, click “assign default values”

Multi-row Delete Function for Notes View

You can now delete multiple notes simultaneously from the Notes view. This feature is useful for deleting multiple unwanted notes based on a predefined criterion. In this example, we want to delete all notes created for “china bistro”
1.   Specify the search criterion “china bistro*”
2.   Click on the main checkbox on the same row as the search fields. This checkbox means check or uncheck all notes listed.
3.   Click the red X to delete all checked notes. You will then be prompted to click OK to confirm the deletion.

Multi-Row Note Delete

Show Hint Feature

Enable hints to better utilize and maximize your Showroom Exchange experience.
To enable the hints feature, hover over “Setup Categories” and click on “settings.”
1.   Check the box to enable the hint feature
2.   Determine if you prefer HINT or ? as an indicator
3.   Click “Save My Options”

Enable Show Hints

Example of the customer view, note the hint option next to the zip code search:

Example Of Show Hints

When I Click on Personalized Bulk Emails, Nothing Happens?

You probably need to turn off your pop-up blocker!

Firefox

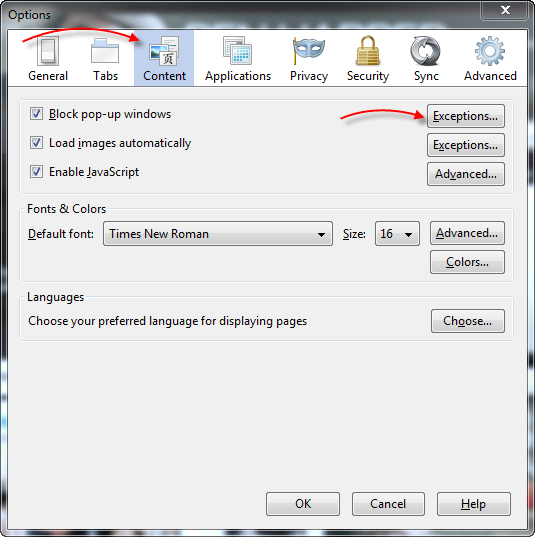
Windows/Mac – Click on “Tools” then “Options.” Choose the “Content” tab and under “Block pop-up windows” click the “Exceptions” button.

Firefox Options

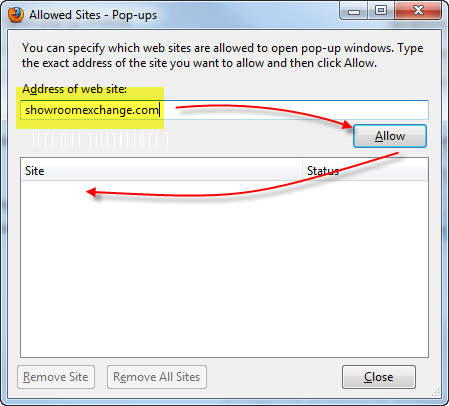
In the “Address of web site:” field, type “showroomexchange.com” and click the “Allow” button. Then click “Close” and “Ok.”

Firefox Allow


Chrome

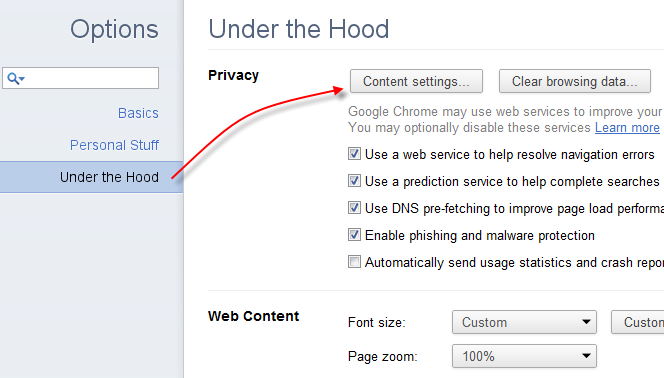
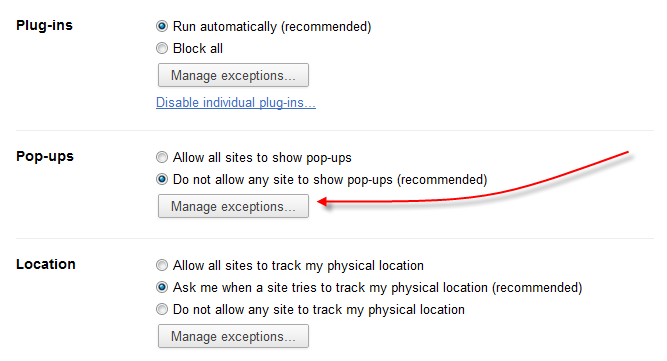
Windows/Mac OS – Click the three bar icon chrome iconand click “Settings.” At the bottom of the page, click “Show advanced settings…” Under the header “Privacy,” click “content settings.”

Under the Hood

Scroll down to the “Pop-ups” section and click “Manage exceptions”

Manage Exceptions

Under the “Hostname pattern” field, type, “showroomexchange.com” and hit enter on your keyboard.

Chrome add PBE

Safari

safari pop up blocer


Internet Explorer 9

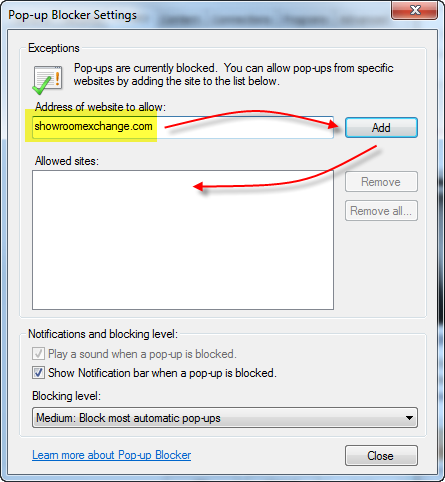
Click on your Windows “Start” button and choose “Control Panel.” Choose Internet Options. Go to the Privacy tab and click on the “Settings” button under Pop-up Blocker.

Internet Explorer Internet Options

In “Address of website to allow:” type in “showroomexchange.com” and click the “Add” button.

Add URL

Click “Close,” and “Ok” to finish.


Showroom Exchange is Sometimes Slow

Showroom Exchange’s optimal performance is dependent on the speed and quality of your internet connection. If you are using up bandwidth (multiple users downloading, or browsing content heavy web-sites OR a slower entry level connection shared amongst multiple users, etc) you will experience a slow-down in Showroom Exchange.

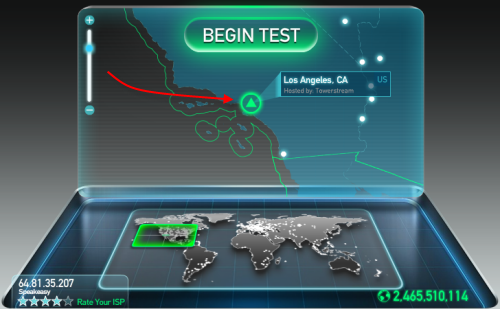
To test your internet connection, visit www.speedtest.net. Click on the circled triangle (see red arrow below) to start a speed test.

Begin Test

Once completed, you will see a results screen, choose “SHARE THIS RESULT”

Share Results

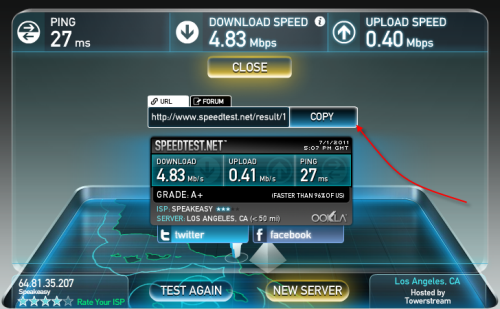
Next a “COPY” option will be provided. Click this button to copy the link.

Copy Results

The button will change into “COPIED.” This means that your internet connection speed test link has been shared to clipboard. You can then paste this into an email and forward it to help@readytoview.com

The pasted info will appear as a link similar to the following URL:

http://www.speedtest.net/result/1234567890.png

Copied Results


3 Symbols for Unique Searching/Filtering

The Vertical Bar ‘|’

For the vertical bar, on your keyboard press SHIFT + Backslash (\ commonly above your enter key ). This allows you to search multiple attributes. e.g.; if you wish to search for customers in California and Oregon, in the state search field, type CA|OR Vertical Bar

The Asterisk ‘*’

For the asterisk, on your keyboard press SHIFT + 8. This allows you to conduct wild card searches. e.g.; you partially remember your customer’s name as “Dream” something. When you search for Dream* in your “cust” column search row, you will find all customers beginning with “Dream.” Asterisk

The Carrot ‘^’

The carrot symbol, on your keyboard press SHIFT + 6. This allows you to search minus a pre-specified criterion. e.g.; You wish to list all of your customers except those located in Los Angeles. In the city field, type ^Los Angeles, thus removing all “Los Angeles” customers. If you believe there are other variation of LA, you may also use a combined list: ^Los Angeles|^LA|^L.A. Carrot Symbol These special characters also function in other search fields. Some reports support the use of these search characters. You may use these search characters in combinations shown in the above example for Los Angeles.


Click HERE for the PDF version

Certain User-IDs Cannot View Specific Reps or Customers

1. Log into showroom exchange as an admin user
2. Hover over the Setup Categories tab and click on showroom users
3. Click on associate rep to ter/subter/state

Setup Categories > Showroom Users

4. Click on the dropdown menu and select the rep that is not showing up

Rep Assignments

5. Select applicable territories, sub-territories, and state OR check all. Here you are associating the respective territories, sub-territories and/or state value(s) to the specific rep

Reps Checked

6. Hit [save changes to current record] or [add new record] when completed

7. Repeat steps 5-6 for every rep listed in the drop-down with partial or no assignment

Reps Drop Down

8. Click “back to list screen”

9. Click the user-Id that is not able to see the rep

User Login

10. Scroll to the middle of the page and look for the rep section

11. Check all applicable reps for this user-Id to authorize access

Rep Check in User Login


12. Click “save changes to current record”

My Customer/Orders/Invoices Page is Really Slow

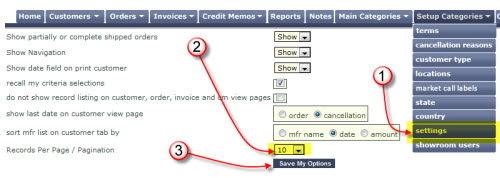
When accessing these pages for lookups, it is best to set the pagination to 10 records.

pagination

An example of when to use a pagination of 100 records per page (or greater) is when reviewing large numbers of record sets during a review process.

**If you set the pagination to a certain amount but the setting is not saved, hover over “setup categories” and click on “settings.” Under “Records Per Page / Pagination” make sure this number is set correctly as well. Click “Save My Options” when completed.

Set Pagination