Personalized Bulk Email Tracking

Showroom Exchange now allows you to track the deliverability of your personalized bulk emails. Check to see if your recipients opened your email campaign and view the click through rate for embedded links that they may have clicked.

Once your campaign is submitted it takes 1-2 hours from the time the recipient opens or clicks on the link for the stats to be populated. For this reason it is best to check campaign stats starting at least 4 hours after submission. Consider checking the stats for the same campaign at different times to track progress.

To track your email campaign, hover your mouse over “Customers” and click on “PBE sent items.”

PBE Sent Items


Click on the stats icon (pie graph) for your email campaign stats.

PBE Pie Chart Icon


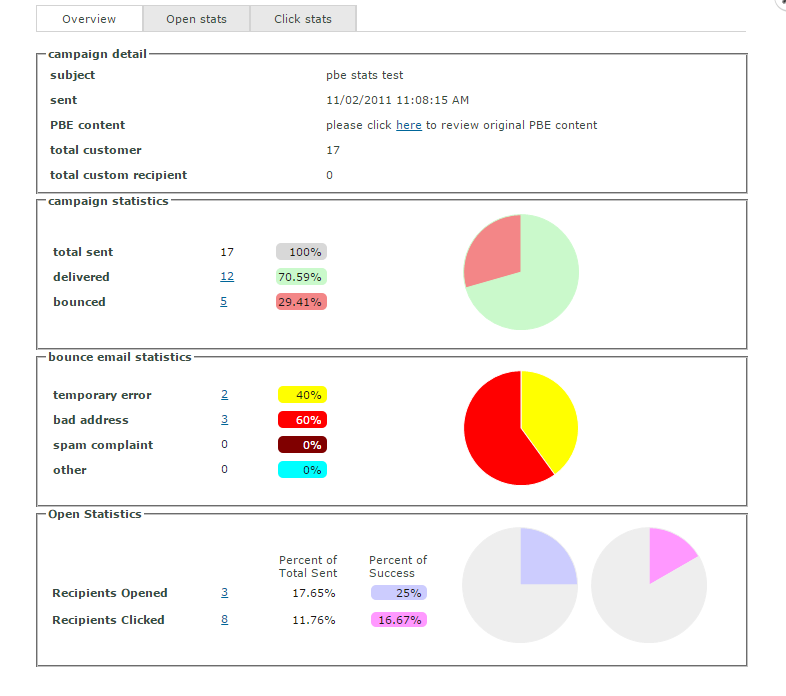
Notice the “Overview”, “Open Stats” and “Link/Click stats” tabs (see screenshot below). The “Overview” tab covers the delivered and bounced rate of your email as well as general open and click statistics.

You can click on the number of Recipients Opened/Click to get more details on who specifically opened and displayed images or clicked on your links.

pbe.stats1


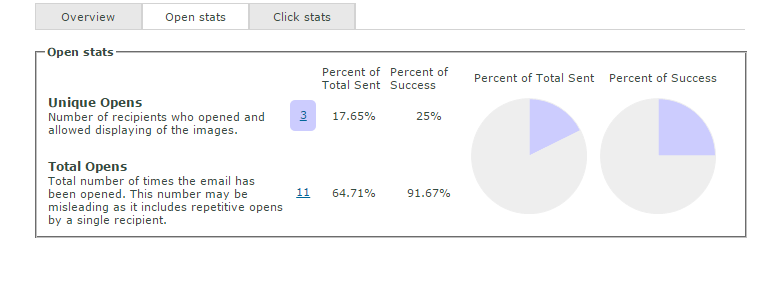
From the “Open Stats” tab you’ll be able to see your open statistics in more detail. You will be able to see unique v. total opens (definitions are on this tab).

pbe.stats2


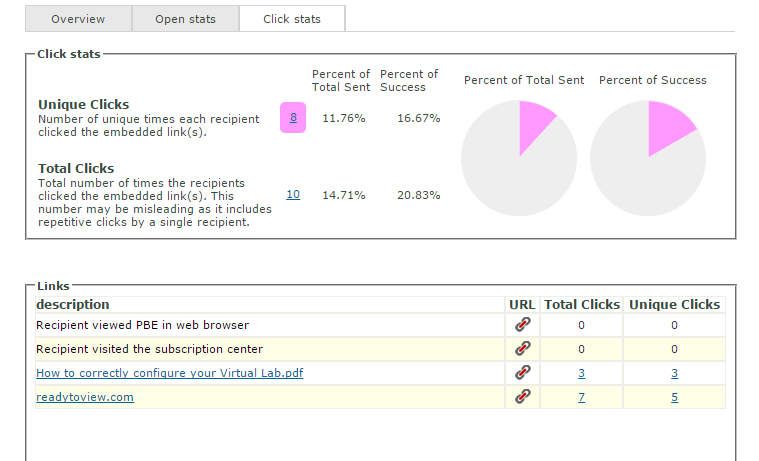
On the “Click Stats” tab, you can see you click stats in more detail. Not only can you see unique v. total clicks, but you can see a unique/total click break down for each of the links within your email.

pbe.stats3


Click on the number to see who exactly clicked on the link.

pbe.stats4


IMPORTANT: Please understand that the open rate is not a 100% accurate measure. The “open” % rate is available only if the recipients email is capable of displaying html with images, and the “View Images” option is turned on when they view your email. If the recipient opens the email but does not allow displaying of images; stats cannot be logged. Link tracking is logged when the recipient clicks on any of your embedded links.


Definitions:
Subject: the subject for your PBE.
Sent: date and time sent.
PBE content: a copy of your sent PBE.
Total customer: the customers you chose to send to.
Total custom recipients: emails that you manually entered (not an existing customer record).
Total sent: count/percentage of total emails sent.
Delivered: count/percentage of emails delivered.
Bounced: count/percentage of emails bounced due to the following reasons below.
Bad address: count/percentage of recipients with incorrect email addresses.
Temporary error: count/percentage of recipients who may or may not receive your PBE. This condition applies to recipients whose mail servers remain (at the time of viewing the stats) unresponsive. No later than 5 days from the time the PBE was sent, these values should become bad address, spam complaint, other errors or delivered messages.
Spam complaint: count/percentage of recipients who marked your PBE as spam. This is most commonly done with the respective email program’s “this is spam”, “mark as spam” or “block all emails from this user”, etc.
Other: percentage of customers who did not receive your PBE that is not classified in the reasons above.
Best Practice for Personalized Bulk Emails

You can never undo a bulk send! When creating a personalized bulk email, don’t forget to first send a test to yourself. This will help confirm that you are happy with the results.

Follow these simple steps. First, create a test customer in showroom exchange and name it after something you’ll remember. e.g.; your showroom and your reps as the contacts. Under the contact email fields, add seed accounts for testing. e.g.;
Email1: yourname@yourshowroom.com
Email1: yourpeer@yourshowroom.com
Email3: yourshowroom@gmail.com *
Email4: yourshowroom@yahoo.com *
Email5: yourshowroom@hotmail.com *
*use existing accounts or create new ones

After your test customer is created, search for it on the customer view.
** MAKE SURE ONLY YOUR TEST ACCOUNT IS LISTED. **
Choose “use email or fax of all contacts” and click “personalized bulk email.”


PBE All Contacts


Now create your personalized bulk email. When completed, be sure to save as a template before sending. This way, when sending a personalized bulk email, you can review it from different emails to verify that you are satisfied with the end results.

If all looks good in the multiple inboxes, you can then send out the blast to your targeted recipients. Also, don’t forget to change the target recipient from ALL to Primary, assuming that you only intend to send it to just the main contact.

Modify Commission Rates When Entering Invoices in JSC

JSC, our alternate customer, order, and invoice entry tool has been revised.

You can now modify the order commission rate from the JSC invoicing page. This feature has been available on the regular invoicing page but has now made its way to JSC.


JSC Invoicing


You can also control which commission fields that are visible for editing by checking/unchecking the following:


JSC Reps


Want to skip the wait time when sorting multiple columns?

On any view page, when sorting multiple columns, by default, showroom exchange will refresh the page before you can select the next column, e.g.; in the following screen-shot, we have state first, city second, and zip third. By default, showroom exchange would have refreshed the page 3 times to deliver the sort order shown below, once after each column is clicked.

Multi Sort

We can change your showroom profile so that the page does not refresh until you finalize the search by clicking search button or pressing enter on your keyboard. Â If you frequently sort by multiple columns, this may be a preferred option for your showroom.

To have us make this change, please email your request to help@readytoview.com.
In the subject line indicate “switch to new column sort.”

I’ve Never (or Not Recently) Sent an E-Blast But I Just Received An Un-Subscription Notice!

You have just received an email notifying you that your customer has unsubscribed from your mailing list but you haven’t sent an e-blast recently. What happened?

When a customer receives an e-blast from a showroom, they have different options for unsubscribing. They can either unsubscribe to the showroom that sent the e-blast, or they can unsubscribe selectively from one or all showrooms that have the same email address in their customer database.

Whether unsubscribing intentionally or unintentionally, you can try to get them back!

The next time you are in contact with your customer, before ending the call, mention that you’ve noticed they have recently opted out from future emails. Ask why they chose to opt out in the first place. Was it too many emails? Were the email content not relevant to them?

The goal is to reengage them back into your mailing list. If you manage to change their mind, you can invite them back.

This is how:
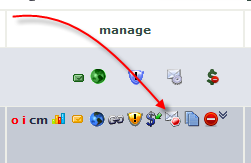
1. on the customer view page, search for the customer and click the mail subscription icon under the manage column
Mail Subscription Icon
2. select the checkbox for their unsubscribed email address
3. revise the invitation making it more personal
Manage Email Subscription
4. click the green “send subscription invite” button
once the customer receives the email, they must agree to be re-subscribed back.

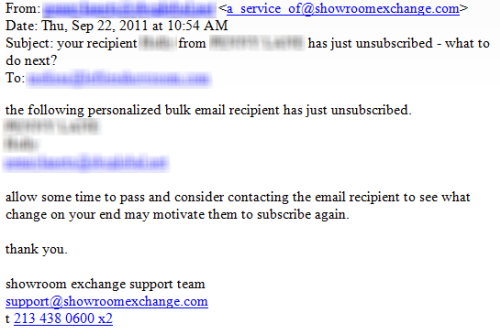
example of an email notifying you that the customer has unsubscribed email:
Example of an Unsubscription Email

FTC requires that email recipients have an unsubscribe option
http://business.ftc.gov/documents/bus61-can-spam-act-compliance-guide-business

My Customer Unsubscribed From Future E-Blasts (Personalized Bulk Emails), Now What?

You have just received an email notifying you that your customer has unsubscribed from your mailing list, what do you do next?

Whether unsubscribing intentionally or unintentionally, you can try to get them back!

The next time you are in contact with your customer, before ending the call, mention that you’ve noticed they have recently opted out from future emails. Ask why they chose to opt out in the first place. Was it too many emails? Were the email content not relevant to them?

The goal is to reengage them back into your mailing list. If you manage to change their mind, you can invite them back.

This is how:
1. on the customer view page, search for the customer and click the mail subscription icon under the manage column
Mail Subscription Icon
2. select the checkbox for their unsubscribed email address
3. revise the invitation making it more personal
Manage Email Subscription
4. click the green “send subscription invite” button
once the customer receives the email, they must agree to be re-subscribed back.

example of an email notifying you that the customer has unsubscribed email:
Example of an Unsubscription Email

FTC requires that email recipients have an unsubscribe option
http://business.ftc.gov/documents/bus61-can-spam-act-compliance-guide-business

BIGGER is Better – New Date Picker

Of course everyone knows that buttons are clickable… (Right?)

Wrong! shockingly, often users do not notice buttons on web pages.

SE uses buttons on many pages to specify the completion of specific actions.

Buttons are important components that must be easy to spot and use.

Building a consistent interface for our users is a constant process. We believe the newly designed buttons will help SE users become more productive. Having “larger” buttons will help you easily identify the correct action without wasting time.


Bigger Buttons


We have also revised the date picker for a more responsive experience. The new picker pops-up immediately.


Date Picker

How Do I Rename My Rep’s UserID?

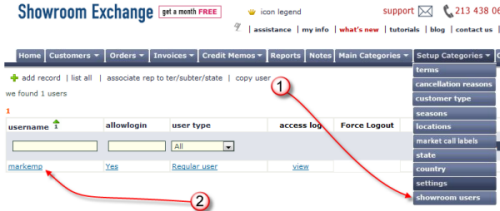
1. Hover over “Setup Categories” and choose “showroom users”

SE Users

2. Choose your Rep’s login username by clicking on the UserID
3. Select the username field and type in the new UserID. You may also change the password if necessary.

Username Field

4. Scroll down to find the email field and update it if necessary.

Email Field

5. Scroll to the end of the page and click “save changes to current record.”

Save changes to current record

6 Benefits of Scanning Orders

Showroom Exchange’s order scanning add-on module (visual order management) allows you to scan and upload (in bulk) your orders (after order-entry).

What is it for?
Instead of leaving your desk to pull a physical copy of the order, use a single click to view the order as an image.

Usage scenario:
If a retailer contacts your showroom and mentions they did not order a style, your reps can view the original order and forward a copy to the retailer if necessary.

Is it right for our showroom?
1- How often should your reps leave their desk to pull an order (from the filing cabinet) but do not because they are too busy or it is too time consuming?
2- How often do your reps pull orders (from the filing cabinet) per day?
3- How often are your reps on the road and require access to the filing cabinet?
4- How do you share a single order copy between multiple locations? e.g.; bicoastal showrooms, home office and showroom
5- With an order image a click away, will your reps be more likely to look up orders?
6- How often does rep-A pull an order and forget to return it (or misplaces it) and rep-B cannot find the same order?

considering #2 from above:
It takes the average rep 2 to 3 minutes to lookup an order (assuming it was properly filed). This includes round trip (for a very small office) to the filing cabinet and re-filing of the order. 2 to 3 minutes does not include time to scan and email/fax, if necessary.
Repeated 3 to 5 times per day (for each rep), that’s approximately a 10 minute average per rep/day vs. 3 to 5 clicks (PLUS one-time scan effort).

Ultimately, it just boils down to time savings and productivity.

What it does not do:
eliminate the order entry process

What next?
– If feasible, measure the above for your own showroom and engage your reps for their feedback.
– Contact us to schedule time for a demo. tel: 213-438-0600 ext 2 or email help@readytoview.com


6 Benefits of Scanning Orders