Annual Sales by Month Report

The Annual Sales by Month report is a great way to analyze your sales and/or shipping metrics by month. This report is highly customize-able.

From the reports tab, as shown below (1), click “Annual Sales by Month” (2).

annual sales by month4


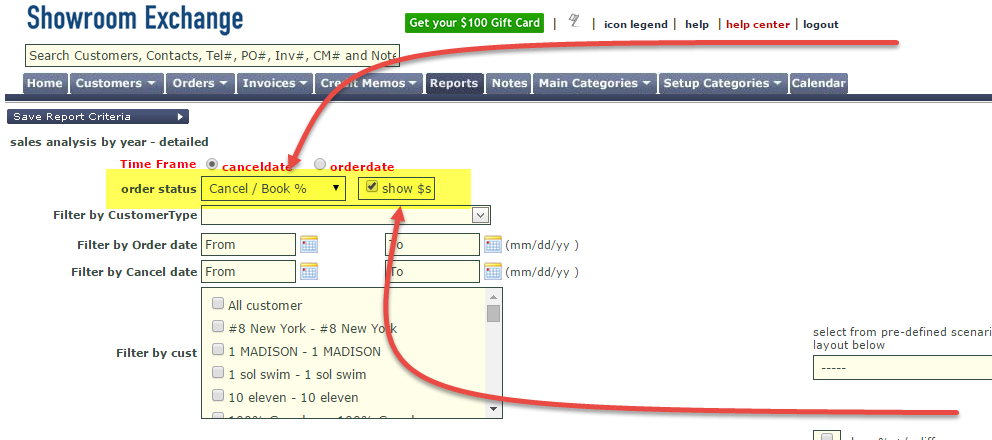
(A) As shown below, the first step is to select the time frame grouping for $s you wish to analyze. Orders have several dates assigned to them. Would you like to group $s based on their order date or cancel date?

(B) In the “order status” drop down, you can select what kind of data you wish to see in your report: active $’s, booked $’s, shipped $’s, cancellation $’s, ship/active%, etc.

(C) The rest of the left side of the page is standard filtering as found in other reports. Use these options for altering the focus of your report to a specific subset of your data.

(D) The right side of the screen is where you choose what aspects of the data you wish to display. Check off the box under the “show” column to include the aspect in the report.
While this grid might be confusing at first, we’ve included some pre-set scenarios to start you off and help you understand the logic.
You can also select which aspect you want to sort by. For example, click the option next to customer code and under “sort” to show your results in alphabetical order by customer name.
The subtotal column allows you to see subtotals by the aspect you check off under that column. For example, see total values for each individual customer.
Check the “customer detail” box to see each customer’s contact information.
Check “show % +/- difference” to see the percentage change from month to month

annual sales by month5


Click “generate report.” you’ll see a results page much like the one shown below. The grid is organized with the options you’ve selected as the columns on the left, with months and year totals on the right. Each row represents a specific customer/rep/territory/ etc.

We do recommend that you use the Export to Excel option for further analysis.


annual sales by month3

Access Social Media Profile of Your Contacts

Save a contact’s social media links in Showroom Exchange. Have the most complete record for all of your customers and potentials, and keep important information easily accessible.

Add a contact’s social media profile by clicking on the yellow pencil icon next to contact’s name when adding or editing customers, or click on the same yellow pencil icon next to the contact’s name in the contact column on the customer tab.


social media links


Once a contact’s social media page has been linked, you can click on the platform’s icon to see the profile on a new page.

social media links 2

How Can I Delete a Customer if they Have Orders Entered in the System?

How Can I Delete a Customer if they Have Orders Entered in the System?

Customer can not be deleted if they have orders (invoice, notes, etc.) associated with them.

purge delete


However, a user can override this block with the purge delete feature. Clicking this button allows the user to delete the customer profile and ALL associated records such as orders, invoices and notes. If you do not see the “Delete And Purge” button, please email help@readytoview.com to have it enabled.

purge delete1


If you want to keep these records, we suggest making the customer profile inactive rather than deleting it (see: 2 Reasons to Make a Customer Inactive)

How to Increase Font-Size for Printable Version of Customer View

There are 2 ways to increase font size for Printable Version of Customer View:
1) Print from the customer (or order tab) and limit the # of columns (see “customize this view“) to only the required information. Fewer columns = Larger font.
2) Use ‘Export to Excel’ and you can edit column/row/text size directly from Excel.

See the video below to see how to make your text/columns bigger before printing from excel


Invoice Date vs. Paid Date

Invoices in Showroom Exchange represent the shipment of the merchandise by your mfrs/brands to your customers.

Entering invoices into Showroom Exchange allows you to keep track of the following:
1) Open Orders (which orders have or have not shipped)
2) Paid and Unpaid Commissions (some mfrs/brands report their shipments to the showroom 1st and pay later)
3) Mfr/brand’s % ship through rate (how WELL your mfrs/brands are performing). More on this in Measure Brand Performance with Ship-Through Percentages.

When entering an invoice, first reference its corresponding PO, give it an invoice number, then provide an invoice date (invdate: the date it shipped). You then have the option of giving it a paid date (pdate). Consider pdate as the date the showroom got paid.

The difference:

  • The invoice date (invdate) is the date the order was shipped. It is required to save an invoice in SE. This aspect of the invoice (along with the amount) tracks how completely an order has shipped.
  • The paid date (pdate) is the date the brand paid you commission on the shipped order. We recommend the date on the check or wire-transfer. If the mfr/brand will pay you later, then leave the pdate blank. An entry in the pdate suggests the invoice is paid, and the invoice is marked as “paid.” An invoice without a pdate will be marked as “unpaid.” See Commissions Report to see how to run reports on paid and unpaid commissions.


invdate v pdate

Cancellation Analysis

Showroom Exchange helps you see how your cancellations $s are distributed so you can work on minimizing them.

Using the “Annual Sales by Month” Report, select either “cancellation $s” or “cancellation count” from “order status”. Select “cancellation $s” to see $ totals of cancellations broken up by month. Select “cancellation count” to see the number of cancellations broken up by month. With either option, you have the additional feature of being able to filter by cancellation reason.

2014-12-15_10-46-15


You can also select “Cancel/Book %” to see the percentage of booked sales that are cancelled/revised. You also have the option to show $s (see check-box in image below). With this option you can see the values behind a percentage. For example, 50% means $600 cancelled out of $1200 booked.

cancelation analysis


You can also use the “Sales by Mfr/Customer” or “Sales by Customer/Mfr” reports to analyze cancellation $s (see image below). Under order status, selected “cancelled.” This report is best to see summary cancellation values, or see itemized/listed specific cancellations. Annual Sales by Month is best for analysis.

cancelation analysis1


From the Order tab, you may view/filter ALL cancellation records:

On the Orders tab, you can also filter by the “cancelled” column. If you don’t see this column, you can activate it with “customize this view” (http://blog.showroomexchange.com/customize-this-view/). With this method, you can filter to see how many cancellations have been made by a customer or manufacturer, how many cancellations occurred within a territory, analyze a specific $ range of cancellations, etc. You can also export or print your findings from the order tab (see below).


2014-12-15_10-08-37


export print order tab

Measure Brand Performance with Ship-Through Percentages

Once the order is booked, it’s up to your manufacturers(mfrs)/brands to credit-approve, produce and ship the goods on-time!

…So that you can receive your commission.

With the Annual Sales by Month report, you can view ship-through %s, i.e.; how completely your mfrs are shipping each month.

From the reports tab, select “Annual Sales by Month.” On the report criteria page, under “order status” select: “ship / active %”, or “ship / book %”. e.g.; $100 was booked, $90 active (due to a $10 order revision), $60 shipped, ship/booked %=60%, ship/active%=66.7%.

We find “ship / active %” to be more fair/realistic of what should actually be shipping.

If you select ship/booked% or ship/active%, you can check “show $” to see dollar values shipped along with the percentage.
Net shipping value, will take into account any negative invoice as well (e.g.; charge-backs, returned goods)

ship through percentage


If You Own YourCompanyDomain.com, There is No Need to Send From “DO_NOT_…@…exchange.com”

In order to send eblasts from anyone@yourshowroom.com we need to update your domain records (for yourshowroom.com hosted @ yourregistrar.com), we can provide the records to be added in a csv (or excel) file.

This is not something we opted in for, but fully support. Our email relay provider has made their rules stricter to minimize spams.

There are 3 ways to handle this, (all 3 will require your login credentials for yourregistrar.com):
1. Ask your i.t. contact to make the change (with CSV/Excel file we will provide) and let us know once you’re done.
2. Provide your yourregistrar.com login credentials to us and we will do the rest. YOU SHOULD change your password after we’re done.
3. If you prefer not to share your password, we can remote connect and guide you through the process.

After the change @ your registrar, on average, it takes approx 2 to 4 hours (we have seen it as little as 30 min and as long as 6 hours) after the change takes affect. Next we will receive a notice that your domain is verified.

We will let you know and you can start/resume sending blasts as anyone@yourshowroom.com

Certain DNS hosting providers such as Yahoo will need to be contacted directly to add the new DNS records. Others like GoDaddy are fast and easy to update.

Note:
Though we have referenced your registrar in this blog post, your name servers (DNS Hosting) is what interests us:
http://en.wikipedia.org/wiki/Domain_name_registrar
http://en.wikipedia.org/wiki/DNS_hosting_service

Order Scans

Showroom Exchange offers the ability to upload order scans as an optional feature.
Keep an electronic copy of the original order on file with the version you entered into Showroom Exchange to stay organized.

To upload order scans, click “maintain order scans” on the order tab.

order scans


Make sure all orders go by the file name “mfr^po#” (i.e. if the mfr code is ab, and the po# is 1234, the file name should be ab^1234).

To add order scans, you can 1) add just one at a time by clicking “add record,” 2) add several, about six, at the same time by clicking “add multiple records,” and 3) by uploading a .zip file by clicking “upload zip files.”

order scans1


Uploading order scans by .zip file is the most efficient way of uploading multiple order scans.

Once you have a group of orders you want to upload, highlight them all in windows explorer (or finder in mac os x) and convert them into a zip file. For Windows computers, right click the highlighted files, hover cursor over “send to,” and click “compressed zip.” More on Method 1 here: http://www.wikihow.com/Make-a-Zip-File

For OS X, visit: http://support.apple.com/kb/PH13964

The name of the zip file does not matter.

After clicking “upload zip files,” select the .zip file to upload. Showroom Exchange will add the order scans to the orders in the system. It will also tell you which files could not be uploaded (often because they haven’t been entered into Showroom Exchange yet).

You can also add order scans by clicking on the icon of a page with a green plus arrow (see below). Once an order scan is added, you can see the image by clicking on the icon of the sheet of paper. You can email the scan by clicking on the sheet of paper with the envelope icon over it.

order scans2


You can also add order scans when entering an order (see below).

order scans3