Measure Brand Performance with Ship-Through Percentages

Once the order is booked, it’s up to your manufacturers(mfrs)/brands to credit-approve, produce and ship the goods on-time!

…So that you can receive your commission.

With the Annual Sales by Month report, you can view ship-through %s, i.e.; how completely your mfrs are shipping each month.

From the reports tab, select “Annual Sales by Month.” On the report criteria page, under “order status” select: “ship / active %”, or “ship / book %”. e.g.; $100 was booked, $90 active (due to a $10 order revision), $60 shipped, ship/booked %=60%, ship/active%=66.7%.

We find “ship / active %” to be more fair/realistic of what should actually be shipping.

If you select ship/booked% or ship/active%, you can check “show $” to see dollar values shipped along with the percentage.
Net shipping value, will take into account any negative invoice as well (e.g.; charge-backs, returned goods)

ship through percentage


If You Own YourCompanyDomain.com, There is No Need to Send From “DO_NOT_…@…exchange.com”

In order to send eblasts from anyone@yourshowroom.com we need to update your domain records (for yourshowroom.com hosted @ yourregistrar.com), we can provide the records to be added in a csv (or excel) file.

This is not something we opted in for, but fully support. Our email relay provider has made their rules stricter to minimize spams.

There are 3 ways to handle this, (all 3 will require your login credentials for yourregistrar.com):
1. Ask your i.t. contact to make the change (with CSV/Excel file we will provide) and let us know once you’re done.
2. Provide your yourregistrar.com login credentials to us and we will do the rest. YOU SHOULD change your password after we’re done.
3. If you prefer not to share your password, we can remote connect and guide you through the process.

After the change @ your registrar, on average, it takes approx 2 to 4 hours (we have seen it as little as 30 min and as long as 6 hours) after the change takes affect. Next we will receive a notice that your domain is verified.

We will let you know and you can start/resume sending blasts as anyone@yourshowroom.com

Certain DNS hosting providers such as Yahoo will need to be contacted directly to add the new DNS records. Others like GoDaddy are fast and easy to update.

Note:
Though we have referenced your registrar in this blog post, your name servers (DNS Hosting) is what interests us:
http://en.wikipedia.org/wiki/Domain_name_registrar
http://en.wikipedia.org/wiki/DNS_hosting_service

Order Scans

Showroom Exchange offers the ability to upload order scans as an optional feature.
Keep an electronic copy of the original order on file with the version you entered into Showroom Exchange to stay organized.

To upload order scans, click “maintain order scans” on the order tab.

order scans


Make sure all orders go by the file name “mfr^po#” (i.e. if the mfr code is ab, and the po# is 1234, the file name should be ab^1234).

To add order scans, you can 1) add just one at a time by clicking “add record,” 2) add several, about six, at the same time by clicking “add multiple records,” and 3) by uploading a .zip file by clicking “upload zip files.”

order scans1


Uploading order scans by .zip file is the most efficient way of uploading multiple order scans.

Once you have a group of orders you want to upload, highlight them all in windows explorer (or finder in mac os x) and convert them into a zip file. For Windows computers, right click the highlighted files, hover cursor over “send to,” and click “compressed zip.” More on Method 1 here: http://www.wikihow.com/Make-a-Zip-File

For OS X, visit: http://support.apple.com/kb/PH13964

The name of the zip file does not matter.

After clicking “upload zip files,” select the .zip file to upload. Showroom Exchange will add the order scans to the orders in the system. It will also tell you which files could not be uploaded (often because they haven’t been entered into Showroom Exchange yet).

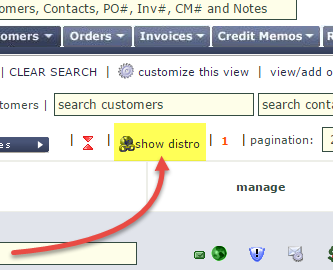
You can also add order scans by clicking on the icon of a page with a green plus arrow (see below). Once an order scan is added, you can see the image by clicking on the icon of the sheet of paper. You can email the scan by clicking on the sheet of paper with the envelope icon over it.

order scans2


You can also add order scans when entering an order (see below).

order scans3


Limit Resetting Market Call Labels to a Person per Showroom

Why might it be a good idea to limit market call labels to one person in the showroom?

  • With one person in control, multiple reps aren’t resetting at the same time, thus making sure all phone labels remain as intended
  • The one person in control should have access to make sure it is OK by ALL reps that it is acceptable to reset market calls, avoiding accidental deletions
  • If one person is in charge, one person is responsible

Meet with your team and see if having only one person responsible for resetting market calls is right for your workflow. Have the admin user check “sAllowMktCallStatusReset” for the user responsible for resetting market calls, and uncheck for all others.

Reach out to us if you need any assistance, help@readytoview.com, 213 438 0600 ext. 502

reset market calls 1 person

Link Multi-Door Stores

If you have a customer with several contacts, all at different locations, Showroom Exchange allows you to link them together.

To enable the “Link Customers” option (chain-link icon) use the customize this view option.

You will be able to…

  • View them adjacent to one-another (indented layout shown below)
  • For the main location, see which sub-stores are linked
  • For the sub-stores, see which location the main one

distro


To link customers, click on the chain-link icon in the manage column (if you don’t see the icon, check “view distro” in customize this view). A popup-wizard will lead you to define it as a main location (e.g.; headquarters) or a store location (one of the doors).

distro3


To show the customer accounts linked layout, click “show distro” next to the pagination setting. After clicking “show distro,” the option will turn to “hide distro” so you can revert to the previous format

distro2


Hover the cursor over the darker chain-link icon to see it’s distribution. This way you can see the distribution without using the distro-layout that is activated by “show distro”.

The dark chain-link icon with a globe icon indicates the main location.
The dark chain-link icon without a globe icon indicates the sub-store location.

distro1

Update “Profile” and “Rating” in Bulk

If you ever need to change the “profile” or “ratings” field for multiple customers, you can do so quickly by editing those fields in bulk.

Click on the “bomb” icon next to either “rating” or “profile” to revise the contents of the respective column. The feature will edit the profiles of the customers that have been pulled-up by searches and filters, not the entire customer base.
The entire customer base WILL BE updated if no filter (search-criteria) has been entered.

There are three kinds of edits you can make:
– Find and Replace: Look for existing content and replace it with a new one.
– Replace Entire Field Contents: Replace the entire field, regardless of its current content.
– Clear All: Clear fields of all selected customers.

Click “Proceed” to save your edits.

Why the “bomb” icon?
There is no UNDO button!

bulk update profile rating


How We Use SE to Track Potentials

We at Showroom Exchange use SE to manage follow-ups with our potentials.

We use Showroom Exchange in two ways to remind us to follow-up with showrooms:

1) the rating/profile fields, and
2) notes with email reminders

The rating and profile columns are great for tagging your customers. The great thing about these columns is that they are open to YOUR implementation and can be updated in BULK.
For example, after we’ve given a showroom their first training, we’ll put a “t1” in their rating profile, and a “t2” after their second. This allows us to reach out to customers that may have missed their second training session, (i.e. we’ll type “*t1*|^*t2*” into the search bar at the top of the column to see who has had their first training but not their second).

Below, we search “pot” to find customers we mark as potentials, whom we can send PBEs to, make market calls, etc.

multiple rep assignment3

2) Make Notes with Emailed Reminders

We also use reminders in the notes feature to be reminded of a specific action. For example, if we contact a potential and want to make sure a follow-up occurs, we’ll make a note for that customer with an email reminder. The email that we receive in a month, or a week… is the reminder to follow-up with the customer.

To make a note with a reminder:

1) Assign a due date
2) Confirm the address you want to send the reminder to
3) Check the box next to “send an email reminder to”

multpile rep assignment2

What Does the (SR) Next to the Rep Name Mean?

Ever wonder why there’s a red “(SR)” next to one of your reps? It’s because they have been assigned as the “Showroom Rep,” the rep used to track commissions due to the showroom from the mfrs (not the individual reps).

sr rep3

The SR rep is not supposed to represent a real rep, including the showroom owner. The showroom owner should have their own record with 0% commission. Consider the following scenario:
Sally’s Showroom and Sally K., the owner
There should be 2 records:

SSR: Sally’s Showroom as the showroom rep
SK: Sally K. as a regular rep @ 0% commission.

When entering order, assign the ‘non-SR’ rep that was responsible for the booking as rep1 and all other reps (if any, who are simply sharing commission with rep1) as rep2, rep3 and on. The final rep on every order will be the showroom rep (SR) – SE will AUTO-ASSIGN the SR rep to the last available rep field as long no more than 5 ‘non-SR’ reps are sharing commission. Whether just one rep made the order or if 5 reps are getting commission on an order, the SR rep is always included. By doing so, Showroom Exchange tracks how much commission is due to the showroom as a whole.

The (SR) rep always receives 100% commission, i.e. 100% of the mfr’s base commission rate, which is then broken down to reps. When adding a new order, the SR rep commission will automatically be switched to the mfr commission.

sr rep2


To edit which rep is the SR rep (there can only be one per showroom), go to the reps page under “Main Categories” and click on a rep name to edit. On the rep edit page, check the box by “this rep is the showroom” to assign them as the showroom rep.

sr rep1

Why is the Best Brand Receiving the Most Attention?

It’s not uncommon for the best performing manufacturer to take all of the attention.

  • Use manufacturer yearly comparison report to monitor booking distribution across your brands (i.e. see if all of your eggs are in one basket). Click here to see how to use the mfr yearly comparison report
  • Use the sales analysis to track ship through percentages to measure your designers manufacturing performance. Eliminate non-performing brands. Click here to see how to use the sales by mfr/customer & sales by customer/mfr reports

Market Call Labels – Make Sure You Reach Every Customer

While market call labels, like many features in Showroom Exchange, can be customized to adjust to the unique workflow of your showroom, below is one suggested use of market call labels- use it to keep track of your customers’ replies to your market (trade show) calls. Identify and follow-up with those customers that confirmed an appointment, but were unable to show.

market call labels1


First, make the labels you’ll need. Click here to see how to create market call labels. Add one for “attended.”

As you make your calls, mark the customers with their appropriate responses and make notes (in the market call column) when appropriate. Come up with an action plan for each label. For example, for every customer that says “follow-up,” set a reminder to follow up in 2 to 3 days before the show/market.

At the show or market, take note of who attends to mark their profile in Showroom Exchange as “attended.” After the market, you can look at who is still marked as “will attend” to see who wanted to see you but ended up missing their appointment. These customers have shown interest, so make sure to followup with them via phone call or PBE!

You can filter your customer list by market call labels. Use this to send eblasts and make notes to groups of customers based on their responses to your market calls. For the “follow-up” customers example above, filter by the “follow-up” label, click the “personalized bulk email” button at the bottom of the page, and in the popup, click on “notes for recipients” to make a note with a reminder for all “follow-up” customers (you don’t have to actually send an email).


market call labels2


You may also do the same by using the “add notes in bulk” icon.


add-notes-in-bulk


When you’re done using these labels and its time to use new labels for the next market, use the market call label reset feature to reset labels and save your notes.